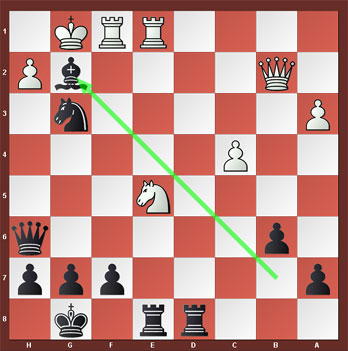
First off, I apologise for the length of this article. This position arose out of the Queen's Indian Defence (notice how I play a variety of openings?). Make sure you have a good cuppa ready before delving into this article. Really.
In this article, what I am trying to do is put my thoughts down so that I know how my thought process works and check with other chess engines to fine tune my thinking process. I think this is a good step (as advocated by Blue Devil Knight on his
Confessions Of A Chess Novice blog) towards improving your chess skills.
Anyway, back to the game (I am Black):
 21. Qxe5. (see 1st diagram on left)
A few questions popped in my mind at the moment but one that is most important.
Should I move my Queen?If I trade Queens, I liberate and free White's bishop after (
21... Qxe5 22. Nxe5). My position has weakened. White has a strong Knight on e5 and my bishop is in a nasty pin. I could always retreat my Knight to the safe outpost on c5 to protect my Bishop but after
(22.... Nc5 23. Bxb7 Nxb7). My pieces are all on the last 2 ranks and I am losing valuable tempo having to reactivate them. No, I am determined to strive for activity here and take central control. To do that, my Queen has to stay on the board.
Allowing White to trade Queens with (
22. Qxc5) is not in my best interests either as I have to retake with my Knight else my pawn structure is fractured (if I do
22...
bxc5) and we run into the same situation with
(23. Bxb7) again (as I mentioned earlier). Hence, I need to move my Queen. So what candidate moves are there?
(21.... Qxc4)(21.... Qxe3+)
(21.... Rfe8)I discarded
(21... Rfe8) immediately since I need to move my Queen.
(21... Qxc4) is nice, winning a pawn but that pawn is absolutely going nowhere. The pawn is isolated and that means that it is weak. When the pieces come off the board later, White will have difficulty defending that pawn anyway. Thus, I didn't think there's a rush to take the pawn for now. It's nice but not the best move, I thought.
That leaves
(21.... Qxe3+). Now we're talking. Taking a pawn and giving check, winning a tempo. Don't forget that sooner or later one of the White Rooks is going to come and plant itself on the e-file so in this case, taking the most forcing move to gain a tempo is crucial. I chose the most forcing move.
21.... Qxe3+
Fritz apparently loves the idea of Qxe3+.
22. Kh1 (forced) Rfe8 (to get the Queen off the e-file) 23. Qb2 (forced) (see 2nd diagram on left) as White has to stop any potential Nf2+ tricks
Now we come to a curious juncture. White's move Rae1 or Rfe1 is definitely coming but if I calculate this right, I should be able to pull my Queen away from it in time.
At the moment, there are no obvious threats to Black. So I followed Makaganov's Famous Rule which is,
"In a position where there are no immediate or direct threats, improve your worst placed piece."So what is my worst placed piece?Evidently my Rook on a8. So I moved it.23.... Rad8 (taking control of the d-file)It so turns out that Fritz also favoured this move.
Other considerations given by Fritz were
(23....Nd6). Honestly, this move didn't occur to me because I have the positional advantage. Why give it away by retreating the Knight from its central outpost where it covers a lot of squares? The only thing I have to be wary of is my Bishop on
b7 (which is unprotected) so I need to keep a close eye on
Bb7.
24. Rae1 (surprise, surprise)
I thought this over for some time. My candidate moves were:
(24... Qc5)(24... Qc3)
(24... Qd4)
Let's consider each move in turn.
(24... Qc5). I didn't really like this move. It moves my Queen, protects my Knight. But it doesn't threaten anything.(24... Qc3) I didn't really feel like trading Queens at this point.(24... Qd4) Same as above.
Then suddenly a thought came to my mind.
(24.... Qh6) Nice. I am threatening (25... Nxg3+) next. I've always loved moves that threatens my opponent because it forces my opponent to halt his attack to perform protective duties.
Only problem is: What do I do after that? So I start to explore this line further. What can White do?
(25. Ne5?) Possible. The Knight is threatening (26. Nxf7) forking Queen and Rook. But that would lead to (26... Nxg3+) forking King and Rook. If I take the Rook subsequently with (27...Nxf1), White can't play (Nxf7) anymore.  But then I run into the problem of (28. Bxb7 Ne3) and then (29. Qc3!) (protecting both Knight on e5 and attack my Knight on e3). I also have the added problem of a possible Bd5 in the future where my f7 is coming under enormous pressure. I gained a Rook for my Knight but more importantly I have lost the dynamics of my position and White despite the small tradeoff, may even gain a slight advantage .
Surely, there must be another way. Ah yes, I found it (I'll explain later). I played
24... Qh6! Fritz complains here, preferring (24.... Qc5).
25. Ne5 (expected) (see 3rd diagram above on left) Nxg3+
26. Kg1 (forced)
Now comes the intermezzo move that took White evidently by surprise.
 26... Bxg2! (see 4th diagram on left)
Fritz liked
(26... Nxe1), taking the Rook first. However, I have a little trick up my sleeve.
Can you see the trick?
Let's see what White can play.
His Rook is obviously under attack twice. So let's consider the candidate move:
(27. Rxf7)I'm going to take time out here and consider this variation so you have a good idea why this move is bad. There's a problem with this move. Because Black has an even more surprising move in store.
 (27... Ba8!!) (see 5th diagram on left)
 What??!! You probably ask.
Here's the nasty trick.
White cannot play
(28. hxg3) (taking the Knight because of
(28... Qh1+ - highlighted by red arrow - 29. Kf2 Qh2+) skewering the undefended Queen.
If White doesn't capture the Knight and moves his Rook on f7 away, now comes the killer move:
(30.... Rd2) (highlighted by the yellow arrow) (threatening 31...Qxh2 followed by mate so White must give up the Queen)
If Knight on e5 moves to f3, Black trades Rooks anyway with ... Rxe1 followed by ...Ne5 (yellow arrow) and ....Rd2 and the position is absolutely crushing.
Now let us return to our position
(see diagram on left) after
26... Bxg2.
27. Qxg2 (forced because 27. Kxg2 runs into the horrible fork 27....Rd2+! winning the Queen)
Now (27. Nxf7 doesn't work because of 27... Qg6 28. Nxd8 Be4! with threats of 29... Nxf1+ or 29... Ne2+ and best of all, White still cannot play hxg3 because of mate on g2 after Qxg3+)
Now let's get on with what White actually played.
28. Nxf7? (see last diagram below on left)
And now the final trick presents itself.
 28.... Qxh2+!
And White is now busted. Interestingly, Fritz didn't like this move. Well.... duh. Of course I am going for the endgame and trade off the Queens.
29. Qxh2 Nxh2
30 Rxe8+ Rxe8 (White Resigns as he is a whole Rook down)
1-0
Phew.
I have no doubt that my chess skills is not up to scratch and my piece co-ordination still lacks finesse. This is an area I definitely need to improve upon.

 In chess, setting traps can be fun. Especially when your opponent falls headlong into it.
 In this case here, have a look at the following position.
 know what you're thinking.... you just gave up a pawn!