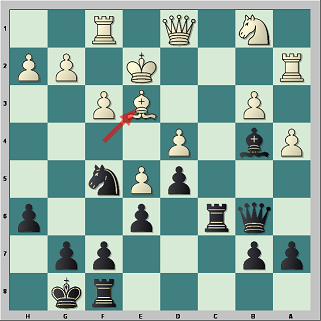
Rather than give you the position and give you a hint, what I intend to do separately here is to show a consecutive sequence of 5 moves that are being played out.
The idea is to mimic an actual game scenario - which it is. Here, no one is going to give you the exact position and say, "White to play and win" or "Black to mate in 3 moves" or something obvious.
No, I am not going to give you any hints at all other than the fact that this is DEFINITELY NOT EASY to see over the board.
So set yourself a time control of at least 20 minutes for the whole of this exercise. If possible, set up the actual board and pieces according to the first diagram shown. Examine each sequence of moves in turn (take your time), when you think you have seen enough and cannot find any good moves, go to the next position. Then think over the position again. The idea is NOT to go backwards. Once you have moved forward each position, do not go back. This is to provide impetus for you to analyse and mimic the conditions exactly similar to an actual game in progress.
Remember: Do NOT RUSH! Take as much time as you like for each position.
Without further ado, let's go onto the 1st position!
FEN position
4k2r/ppq2pp1/2r1p2p/3pPn2/Pb1P1B2/1P6/R3KPPP/1N1Q1R2 b k - 0 19
4k2r/ppq2pp1/2r1p2p/3pPn2/Pb1P1B2/1P6/R3KPPP/1N1Q1R2 b k - 0 19

19. Rf1
Black to play and move
Examine this position carefully,
if you're happy that there are no tactics available here,
please move on to the next position
Black to play and move
Examine this position carefully,
if you're happy that there are no tactics available here,
please move on to the next position
20. f3
Black to play and move
Examine this position carefully,
if you're happy that there are no tactics available here,
please move on to the next position.
Do NOT go back to the previous position.
Black to play and move
Examine this position carefully,
if you're happy that there are no tactics available here,
please move on to the next position.
Do NOT go back to the previous position.
 20. ... Qb6
21. Be3
Black to play and move
Examine this position carefully,
if you're happy that there are no tactics available here,
please move on to the next position.
Do NOT go back to the previous position.
 21. ... Rfc8
22. g4
Black to play and move
Examine this position carefully,
if you're happy that there are no tactics available here,
please move on to the next position.
Do NOT go back to the previous position.
 22. ... Nxe3
23. Kxe3
Black to play and move
Examine this position carefully.
This is the last position.
Now, have you seen the tactic that was immersed in one of these positions?
One of the above diagrams contains a very deep tactic, one that is not easy to spot. If you cannot find it, don't fret. I didn't see it either.
To see the answer, please highlight between the brackets.
[The very deep tactic occurred on move 22. g4 for Black above - the 2nd last diagram. The amazing tactic goes as follows:
23. Kf2 (Note: White is worse after ....
23.Qd3 Rc2+
24.Rxc2 Rxc2+
25.Bd2 Nxd4+
26.Ke3 (26.Kg3 Bxd2 27.Nxd2 Qd3 28.Rf2 Nxb3 and White loses a piece)
26.... Qb6
27.Kf2 (if 27. Qxd4 Bxd2+ 28. Nxd2 Rc3+ and the White Queen is lost)
27.... Bxd2
28.Nxd2 Nxb3+
29.Kg3 Nxd2 )
23... Rc2+! An amazing sacrifice, you say.... watch what follows now
24. Rxc2 Rxc2+!
25. Qxc2 Qxf1+!! An incredible temporary Queen sac - did you see it?
26. Kxf1 Nxe3+
27. Ke2 Nxc2
Now Black gets back all his material and is a piece up and winning. Incredible.
]


Very good example! I intend to devote a post to the position since it gives beautiful examples of what I want to demonstrate. I hope you don't mind.
ReplyDeleteTemposchlucker : thanks! by all means, go ahead!
ReplyDeletecheers